
Quick Reference Guide
Perhaps you know exactly where your CerPrint Ceramic Decal Printer user manuals are. If they are buried in a drawer somewhere, no worries. This reference guide is for you.
• Only feed CerPrint Ceramic Decal Papers into the machine using the bypass tray. Using trays 1 or 2 for decal printing may cause jams.
• Jammed paper may be covered with unfused toner. Avoid getting toner on your hands or clothes.
• After clearing a decal paper jam, toner may insufficiently fuse and smudge. Make test prints on regular paper until smudges disappear.
• Do not forcefully remove jammed decal paper because it may tear. Leaving torn pieces inside the machine will cause further jams and possibly damage the printer.
• Decal paper jams can cause pages to be lost from the job. Check your print job for missing pages and reprint any pages that did not print.
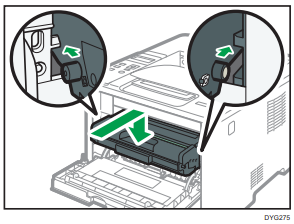
Removing a jam from bypass tray
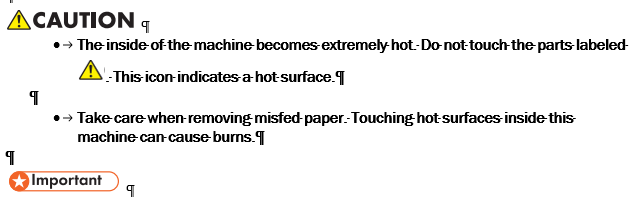
- Carefully remove the jammed paper from bypass tray.
2. Close the bypass tray.
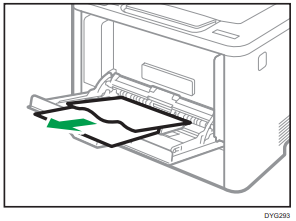
3. Push the side button opening the front cover and then carefully lower it.
4. Grasp the center of the print cartridge and carefully raise it slightly before pulling it out horizontally.
• Place the print cartridge on paper or other material to avoid dirtying your workspace.

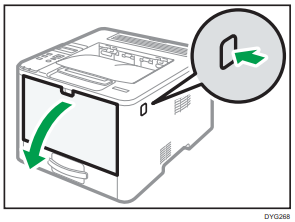
5. Lift the A lever and carefully remove all jammed decal paper.
6. Slide the print cartridge in horizontally. When the cartridge can go no farther, raise it slightly and push it in fully. Then push down on the cartridge until it clicks into place.
7. Using both hands, gently close the front cover.
8. Jams may also occur in the fuser area. Open the rear cover by folding it back and down, away from you. Inspect the fuser area to see if paper is jammed there. Be careful. The fuser rollers will be hot. We recommend you let the printer cool down before removing the jam.
9. There are two green tabs on either side of the fuser rollers. Move both down until they snap into the ”Down” position. This relieves the spring tension on the rollers. Grasp the jammed paper on either side with your fingers and pull gently until it is free of the fuser.
10. Above the fuser rollers you will see a set of small plastic rollers. Look to see if any decal material has adhered there. If so, snap out each roller and clean it off with alcohol or the edge of an exacto knife. Snap it back in and proceed as before until all the rollers are clean.
11. Return the green tabs to the “Up” position and close the rear door.
12. We recommend running 5-6 sheets of plain copy paper through the printer to clean any toner and/or decal material of the main fuser rollers before printing another job. This is easily done by creating a Word document with a single period in it and setting the copy count to five.
13. After printing, inspect the front and back of the sheets for any toner smudges or particles of decal film. If the last page is not clean, repeat the process until it is.